
Considerations on the flute
I would like to share here some thoughts on the flute, its playing, its learning and its teaching. They will be of interest to flautists, teachers or not, who reflect on their playing and the way of transmitting it. It is not an exhaustive method but rather a compilation of points that I have gathered into chapters and which I submit to your opinions and comments.
These considerations are the fruits of the knowledge transmitted by my teachers, my personal research and my experience with my students, who taught me as much as, I hope, I was able to give them.
1. Holding the flute
Holding the instrument is a major issue, for the comfort and the pleasure of playing and, of course, for the quality and stability of the sound. Carrying the flute is a challenge that is not easy to overcome, especially for young learners who do not yet have their final body shape and perfect mastery of their motor skills.
Adapted instruments (so-called “curved headjoint” or “waveline” flutes) allow practice as long as the length of the arms is not sufficient to play a large flute. However, good habits should be established as soon as possible, especially with the following points of contact:
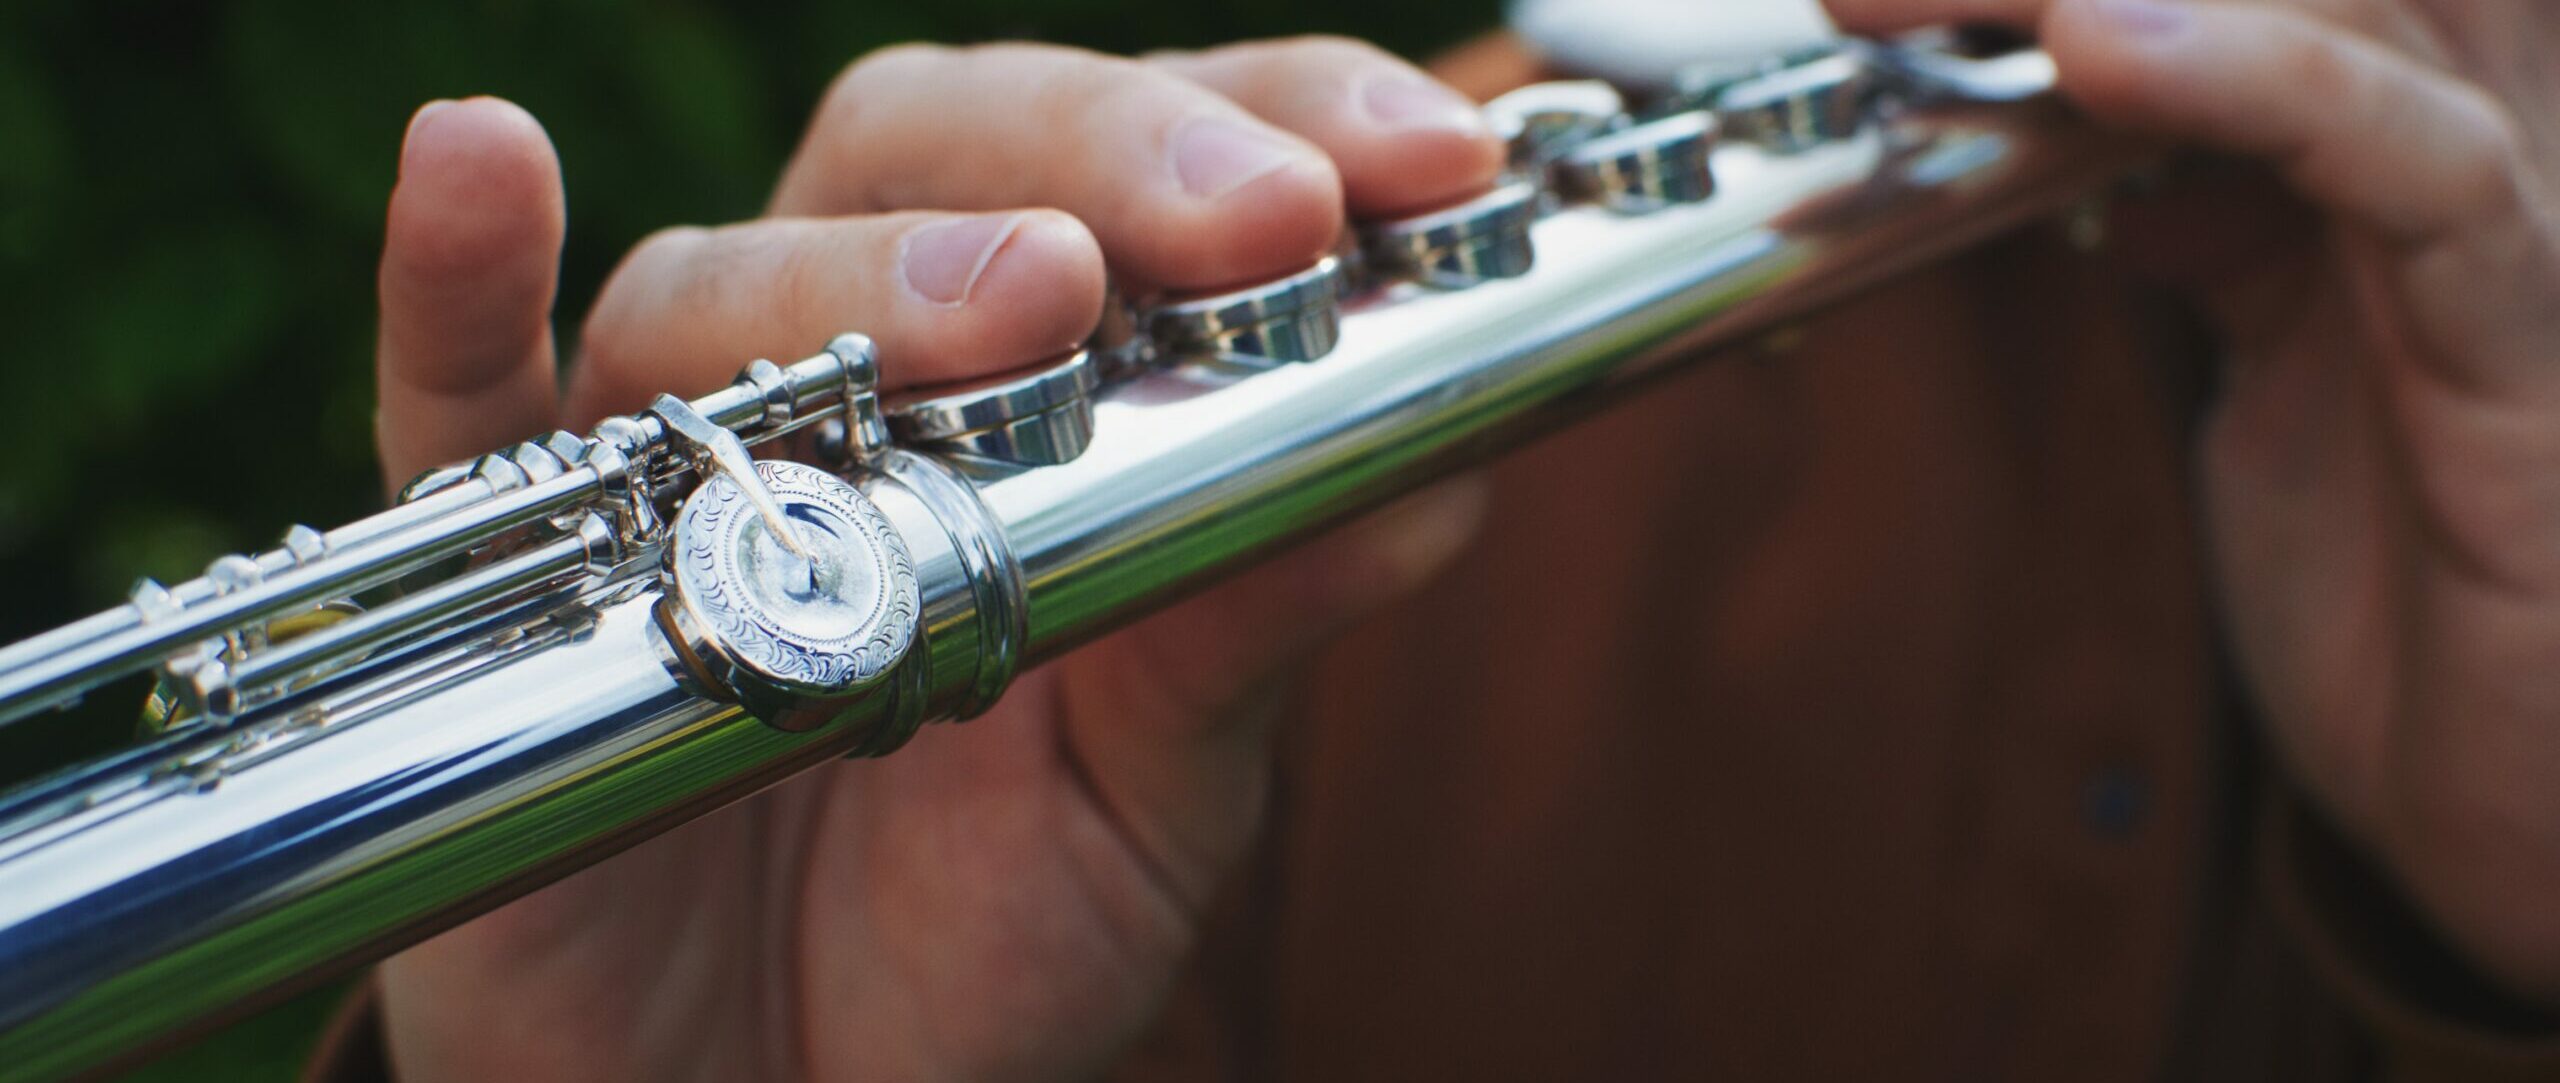
- Right thumb: it should be placed under the index finger (F key) to form a “pinch”. It can be positioned slightly towards the rear of the instrument in order to create a pair of opposing forces: the opposing force is provided by the index finger of the left hand, bringing the flute towards the rear and stabilizing the embouchure in the hollow of the chin.
- Left index finger: this finger should be placed on the flute in the middle of the first phalanx, at the level of the muscle, thus preserving the articulation of the index finger to the palm (metacarpus). This also leaves the tip of the finger free to operate the key. The left wrist must be placed sufficiently above the flute so that the action of the left thumb does not cause movement of the hand, which is detrimental to the stability of the instrument.
- The right little finger, placed on its key, provides a welcome additional point of contact on the majority of notes on the flute. The natural D (low and medium) benefits from sufficient other fingers placed.
The fingers of the right hand are slightly curved above the flute, without touching the rods. This slight curvature also concerns the little finger that we have just talked about. An extended little finger tends to cause twisting of the three middle fingers and the wrist, which is not desirable for good mobility.
When the fingers are not placed on the keys, care must be taken to ensure that the distance between them and the keys is small enough to facilitate velocity and synchronization.
Finger synchronization is particularly important to the quality of linked play and I will return to this below.
Finally, the fingers must be toned but not excessive: their weight is enough to close the keys without it being necessary to press hard, at the risk of stiffening. The clenching of the fingers reverberates through the arms and sometimes even up to the shoulders and back.
2. General posture
Anchoring in the ground, with both feet placed on the ground and the weight equally distributed in both legs contribute to general stability. Good posture allows for good abdominal breathing, making sure to keep your shoulders low and your elbows relaxed, naturally drawn to the ground by gravity. Be careful, however, not to bring the elbows too close to the bust, which would block your chest when inhaling. All parasitic gestures should be avoided because they are unsightly and counterproductive. I particularly draw attention to the bad habit adopted by learners of using their left shoulder to put to one’s mouth or of completely covering the embouchure hole with their lips before pivoting the flute outwards to play. It is advisable as early as possible to “memorize” the location of the lower lip on the embouchure plate and to know how to find it using the usual positioning of the arms and the sensitivity of the lower lip.
Another parasitic gesture consists of tapping the beat with the foot or marking it with the flute using jerky gestures. I encourage learners to internalize the beat. I know the importance of the gesture which contributes to the mastery of rhythm, the proximity of dance and music no longer needing to be demonstrated. But here’s the thing: when you’re playing, it’s better to dance in your head! At the very least, ensure that the flautist’s movements accompany his playing without disturbing it.
3. Sonority
Now let’s talk about sonority. Many parameters are involved in the creation of sound and some are specific to the traverse flute. We are the only instrumentalists who form the sound by channeling the air with his lips without direct contact with the sound pipe. A small amount of air will definitely not enter the flute and create sound. There are some losses around the bevel.
The absence of constraint for the air to enter the mouthpiece contributes to the softness of the tone of the flute as well as its relative power (to be compared to instruments with mouthpieces or reeds and brass instruments whose mouthpieces are narrow). Moreover, within the family of transverse flutes, we see the link between the smallness of the mouthpiece, the volume of air to vibrate (size of the resonator tube) and the sound power: the piccolo is thus more powerful than a bass flute.
A technique is shared with other wind instruments: abdominal breathing which allows, by the help of the diaphragm, to control the flow of the expelled air. The challenge is to be able to control the quantity and speed of the air: this is what is commonly called “support”. This control makes it possible to overcome the difficulties linked to the acoustics of the instrument. For the flute: play hard in the low, play softly in the treble. This also makes it possible to counter certain natural reflexes such as blowing more just after inspiration instead of distributing the stored air equally, ensuring the flow (and therefore accuracy), whatever the nuance, until the silence or until the next breath.
Parameters for sound formation:
- The shape of the “lip opening”, the hole formed by the lips and muscles of the mask through which the air is exhaled. The “lip opening” is usually flattened by stretching of the corners of the lips and slightly rounded at the nasal cavity. The canal formed by the lips is more or less centered depending on the morphology of the latter. We will seek to minimize the muscular effort provided, particularly in the high register, by reinforcing the speed of the air through the action of the diaphragm rather than through the narrowing of the larynx, of the oral cavity or through the pinching of the lips.
- The steering angle formed by the slight withdrawal of the lower lip, an offset which allows air to be blown onto the bevel while preventing too much of it from being lost. We can speak of a “parrot’s beak” to image the imperceptible movement of the lower jaw which allows us to significantly influence the angle of the air jet, which is particularly useful for correcting the weakness of certain notes, notably the C#, which is too high and very hollow if the air is not blown low enough on the bevel.
- The configuration of the throat and the mouth, like singers, generally seeking opening and relaxation so as not to disturb the access of air. Sometimes, it is even advisable to make it easier by shaping the oral space to better channel the air to the outlet of the lips. The position of the tongue, palate and lower jaw also influence air speed and therefore intonation.
- The “lip opening-to-bevel” distance: this parameter is generally treated by rotating the flute with the hands. It is important to find the right compromise between a sound that is too “covered” or not “covered” enough. Too “covered”, the air is constrained by a shortening of the distance between its exit from the lips and its impact on the bevel: the sound is then too closed, brassy, saturated and low in intonation. Too “uncovered”, the air is lost when passing above the bevel: the sound is then too clear, with little timbre and high intonation. The ideal position is generally that allowing the keys of the body of the flute to be horizontal, parallel to the ground. The mouthpiece hole should be aligned with the keys. Thus, the steering angle mentioned above is as natural as possible and the “lip opening-to-bevel” distance adequate.
I note in passing that some study flutes have engraved signs to facilitate the alignment of the mouthpiece with the body. At Yamaha for example, I consider that the mouthpiece is positioned too far outside, which leads young learners to “cover” with their hands. Faced with a student who covers, the best remedy is often to retract the embouchure by turning the head one or two millimeters inwards. This makes it easier for the flautist to blow on the bevel while keeping the keys parallel to the ground (and incidentally, the right wrist in line with the forearm).
Curved head flutes present a real challenge in finding the correct alignment configuration. The curved head influences the general gravity of the instrument and it should be arranged without creating any constraint reflected in the hands. Likewise with the “waveline” flutes: I recommend placing the wave towards the bottom. Placing it backwards in fact creates an imbalance which contributes to turning the flute inwards, therefore “covering”.
4. The “mask”
The multitude of small muscles surrounding the lips (hereafter called the mask) help to form the channel through which exhaled air goes from the lip opening to the bevel and it is in this interstice that the quality, the purity of the sound resides. The air is propelled evenly and arrives freely, unobstructed, with the correct speed and quantity to produce the desired note. The mask contributes to this sound quality.
However, you must make sure to depend as little as possible on the mask in order to play without tiring. When overworked, the muscles of the mask may tremble and, if fatigued, the sound may deteriorate. This is especially the case when it comes to playing in the high range and the lips are pursed to compensate for a lack of diaphragm support. The lips compensate for too much and/or a lack of air speed and the mask becomes tired. If the air is not properly channeled, the sound becomes veiled in a whooshing sound and loses its purity.
Practicing low-pitched sounds, played very gently, seeking as much relaxation as possible around the lips is very beneficial for this. It is a question of shaping the mask in such a way as to channel just enough to ensure the air reaches the bevel without loss but to realize that the essential is controlled from lower down, from the base of the “column d ‘air “. The release of the mask is more difficult to maintain in the higher registers but you should still try to maintain it as much as possible. We achieve a good result by managing to dissociate the quantity of air and its speed: again, it is the control of the support which is essential.
As we see, a beautiful sound is ultimately the result of many parameters. Control of all these parameters cannot be done constantly and consciously. Only regular practice and good listening, both to one’s bodily sensations and to the sound result, allow one to acquire a playing comfort which makes the flute an extension of oneself, a medium for transmitting musical emotions.
Sound quality is only a tool for musical expression. There are even musical languages where the beauty of sound (which is ultimately subjective, like any aesthetic canon) is not essential.
However, a nice sound is not enough. Another challenge is to know how to start and end a note, this is the work to be carried out on attacks and on the gradual or abrupt way of returning to silence, or even of ensuring the passage from one note to another.
5. The legato
The practice of legato, the care taken in changing notes, the “filling” of intervals, small or large, represent an issue of musical expressiveness of the melodic line. The flute, like any other monodic instrument, is particularly appreciated for this ability. The musical phrase is based on the quality of this legato. Flexibility in intervals is ensured both by:
- a perfect finger synchronization to avoid small snags.
- the support, by a possible modification of the air speed, especially if there is a change of register, dynamics, color, vibrato.
- the mask, because even if the movements of the mask are to be limited, certain micro-adjustments intervene to properly channel the air, to slightly change the angle of the flow on the bevel in order to correct the accuracy, etc…
Once again, these elements are not conscious but are the fruits of practice, of repetition, in order to obtain the expected result.
Ideally, the flautist in the act of playing no longer thinks about the technical contingencies of the flute in his hands. Totally liberated, he is entirely focused on the right place to give to each note, on the direction given to each phrase, on the meaning of each moment of music produced. Priceless ephemeral moments, where the perception of Time is no longer the same, for those who know how to listen.
6. As a conclusion
To finish, I would like to talk about how to get concretely involved in musical play. I wish all learners to have the chance to develop as early as possible the ability to hear the pitches of sounds internally. A good inner ear allows you to prepare for sound production. Anticipation begins by reading the score in advance and, if possible, thinking about the notes as you play them. Seeing them, reading them on the scope is one thing; thinking them, hearing them further facilitates their production and mastery. Thus, we become fully involved in the musical discourse and, as long as we have grasped the meaning of what the composer wishes to express, we become the faithful transmitter, the daring interpreter of his message, to an esthete and music-loving public.
